Table of Contents
Garbage disposal leaking? Let’s fix it!
Although leaking garbage disposals are not typically detected until a puddle is forming under your sink, there are a number of solutions to address the issue before it becomes a larger problem. The first and most important step in fixing a garbage disposal leak is to determine where the leak is occurring. Finding the leak is as simple as learning and observing the components of your sink and often, the repair is easy enough to fix yourself. Troubleshooting the issue can be completed independently and often saves you the time and cost of replacing an entire garbage disposal unit!
Before determining if and how your leak can be fixed, you MUST remember the garbage disposal unit needs to be UNPLUGGED and the power to the unit should be completely shut OFF! Failure to complete these steps could result in serious injury and/or electrical shock. Also important to note, avoid placing hands near sharp blades of the disposal and if at all possible, use tools to clear blockages.
As stated, the first step to fixing the problem is to determine where the garbage disposal is leaking. Locating the leak allows you to create the most effective plan of action and most leaks are present at the top, the bottom, or the side.
Locating the leak is as simple as wiping off the sink with a dry cloth, pouring water down the drain and watching closely to see where the water escapes. A leak happening towards the top of the sink will likely appear while the sink is plugged and a leak towards the bottom of the sink will likely appear while the sink is unplugged.
Leaking at the top?
If water is leaking from the top, the cause could be a leaky gasket or a leaking flange. 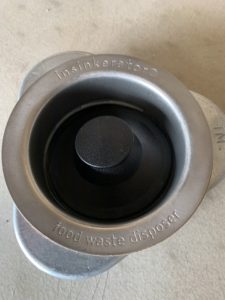
We will first address a leaky garbage disposal gasket. The garbage disposal gasket is the top rim where the rubber meets the flange. A gasket leak can be caused by several different factors. A few causes could be the aging of the gasket, a lack of use leading to a dry gasket, and improper sealing of the gasket if the garbage disposal unit had been replaced in the past. If a gasket has not been securely locked on all three sides, it will leak.
Luckily, replacing the gasket is an easy fix. Visit your local hardware store to purchase a replacement gasket and follow the steps listed below to address the leak.
- Disconnect the drain and unplug the cord to the garbage disposal. If you have a dishwasher, remove the drain hose from the disposal unit.
- Unlock the garbage disposal unit by grabbing the sides of the mounting nut and twist counter-clockwise. The unit should drop straight down. Move the entire disposal unit, but keep it close enough to where you can see the rubber gasket while working on it.
- Remove the old gasket and replace it with a new one. Ensure the new gasket securely pops into the lip and sits flat.
- Lift the entire garbage disposal unit while looking down from the sink to verify the gasket is flat before securely locking back into place.
- Check that all three mounting grooves are locked in.
- Reconnect drain, plug cord back in, and check for leaks.
If the gasket does not appear to be the problem, the flange may be the culprit. The flange connects the garbage disposal to the sink and prevents unwanted debris from entering the drain. If the leak appears to be near the upper part of the garbage disposal, the flange is likely the cause.
The flange is most often attached beneath the sink with bolts and securely sealed at the top with a clay-like substance called plumber’s putty. The two most common causes of a flange leak are worn down plumber’s putty or loose mounting bolts. The plumber’s putty can deteriorate over time and lose its watertight seal. The mounting bolts can loosen, likely from previous plumbing repairs under the sink.
If the plumber’s putty has loosened, you may be able to stop the leak simply by adding more plumber’s putty to the seal. To do this properly without removing the entire garbage disposal, loosen the retaining bolts until a small gap appears, apply more plumber’s putty between the pipe and the flange, and retighten the bolts to re-create the watertight seal. If this fix does not work properly, you may need to remove the entire garbage disposal unit and reseal the flange. Follow the listed steps below to remove the garbage disposal unit and reseal the flange.
- Drop the disposal down.
- Use a tool to loosen the bolts that tighten the flange.
- Locate the clip that holds the bottom flange in the correct position.
- Obtain something flat (flat head screwdriver will work!) to pop the clip out of its groove.
- Pull the top flange out from the top of the sink.
- Use a putty knife to remove any old putty from the sink before replacing the flange.
- Roll a snake of plumber’s putty (plumbers putty can be bought from your local hardware store) between your hands. Recommend snake roll be between 1/8th to 1/4th of an inch wide and long enough to line the width of the sink flange.
- Wrap the snake of uniform width around the top of the flange.
- Gently push the flange back into place and reapply the bottom flange (with the clip holding it in place).
- Tighten screws back into place.
- Clean off any additional putty with a wet rag or cloth.
- Lock the dispenser back into place, reconnect drains, and test for leaks.
Leaking on the side?
A commonplace for garbage disposal leaks to occur is at the connections of drain lines. There are two main drain lines that could cause the side of the garbage disposal to leak. These two drains include the dishwasher drain and the main line drain.
The dishwasher drain line is the smaller, more narrow hose where the dishwasher drains into the disposal. This allows the dishwasher to expel any leftover food and residue that would otherwise accumulate in the actual dishwasher unit. The main line drain is the larger pipe located towards the bottom of the unit and drains out of the disposal into the sewer.
If the leak appears to be on the side where the dishwasher hose connects to the disposal’s dishwasher inlet, the problem is likely a loose metal clamp. To resolve this leak, tighten the clamp with a screwdriver. However, if the leak does not resolve after tightening the clamp, the problem could be a warped or cracked hose. In this case, replace the cracked hose with a new hose and the leak will disappear.
If the leak appears on the side where the disposal meets the waste drain pipe, 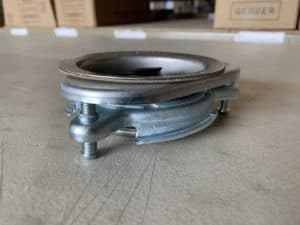 there could be two issues. First, simply tighten the screws that secure the drain pipe to the garbage disposal unit. If this does not resolve the leak, the issue may be the gasket. In that case, remove the screws to detach the drain hose and replace the old gasket with a new one. You can purchase a gasket at your local hardware store. One of these solutions should fix the leak on the side.
Leaking from the bottom?
As garbage disposals age, it is not uncommon for the entire unit to develop cracks along its interior lining. If you have one crack in the lining, it is likely others are forming, Unfortunately, water leaking from the bottom of the unit is not an easy fix and often requires a full garbage disposal unit replacement.
Remember that water and electricity do not mix well, so a garbage disposal unit replacement is recommended as soon as cracks are detected. Installing a new garbage disposal unit will fix the leak at the bottom of the drain and will save you from garbage disposal repairs for the next 8 to 15 years!
Is your problem fixed? Prevent it from happening again!
Once you have addressed one of the issues above, check the leak has been fixed by pouring water down the drain and making sure no water escapes. If the leak has disappeared, it is safe to plug the garbage disposal unit back into the wall outlet and turn on the power to the unit.
To prevent future issues from happening with your garbage disposal unit, avoid placing items such as bones, potatoes, celery, eggshells, coffee grounds, etc in the garbage disposal. These hard items can create cracks and lead to early wear and tear of the garbage disposal drains. Remember to use the garbage disposal unit to grind only soft foods and run cold water after the use of garbage disposal to loosen up any food and prevent solids from forming at the bottom of your drain. Keeping a close watch on your drain throughout the year and catching any small repairs before they become larger problems will save you the cost and hassle of larger repairs of replacements in the future!

According to Kelson Carter, the Prince of Plumbing, “to prevent future garbage disposal leaking issues from happening, avoid placing items such as bones, potatoes, celery, eggshells, coffee grounds, etc in the garbage disposal. These hard items can cause cracks and lead to earlier wear and tear of the garbage disposal drains. Remember to use the garbage disposal unit to grind only soft foods and run cold water after the use of garbage disposal to loosen up any food and prevent solids from piling at the bottom of your drain. Keeping a close watch on your drain throughout the year and catching any small repairs will save you the cost and hassle of larger repairs or replacements in the future!” Read more tips.
If you are looking for plumbing companies in Indianapolis to help with your garbage disposal issue please do not hesitate to contact Carter’s My Plumber.


